This tutorial shows you how to install the DimensioneX game engine.
You don’t need to install the game engine just to play games. You can play simply by going to our play now page.
Installation is needed if you want to develop multiplayer games on your computer, with the option to publish them online later for playing with other people.
Basic concepts
DimensioneX is a server application written in Java 1.8. It runs inside a Java-powered webserver, such as Tomcat. Because it’s written in Java, it theoretically can run on any computer.
The typical running environment include Java Development Kit (JDK) version 1.8, and Tomcat 7, but it might run also on other configurations.
The game engine package is available into two flavors:
- A Ultra-simple package aimed at beginners, running only under Windows.
- A generic package (file with .war extension) which needs to be installed (or, better said deployed) inside a working Tomcat server. This method is advised if you are not using Windows or when you are familiar with Tomcat.
Method #1: simple installation
1. Go to our Download page and pick the first option “Ultra-easy package“. You will download a rather big file (>200 MB) named dimx_complete.zip
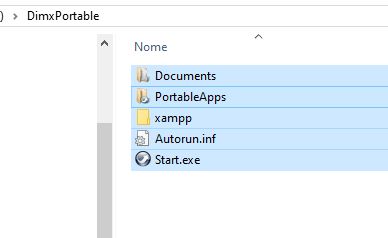 2. Unzip the file preserving folder structure, you should get three folders (Documents, PortableApps and xampp) and two files (autorun.inf and start.exe).
3. Move all the above to the root folder of an external USB drive: this way you can use DimensioneX on any Windows computer, for example you could develop/use your game project at home and at school.
If you prefer, you could move folders to the root of your C:\ drive instead, should you plan to work on your own computer only.
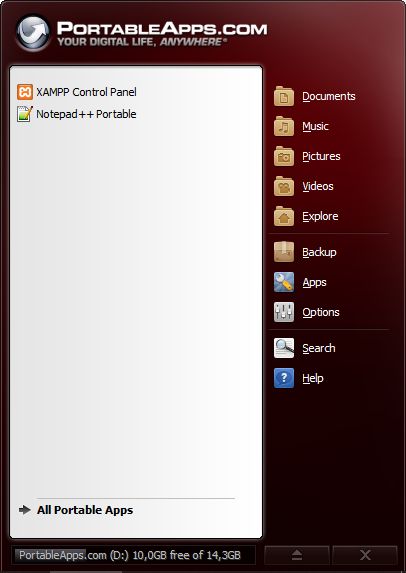 4. Open the root folder of the disk drive you placed stuff into, there should be a Start.exe executable. Double click it: a menu named PortableApps will appear. This menu remains accessible in the lower-right corner of your taskbar, possibly in the icon tray.
5. Inside the PortableApps Menu, click XAMPP control panel. A window like the following should open:
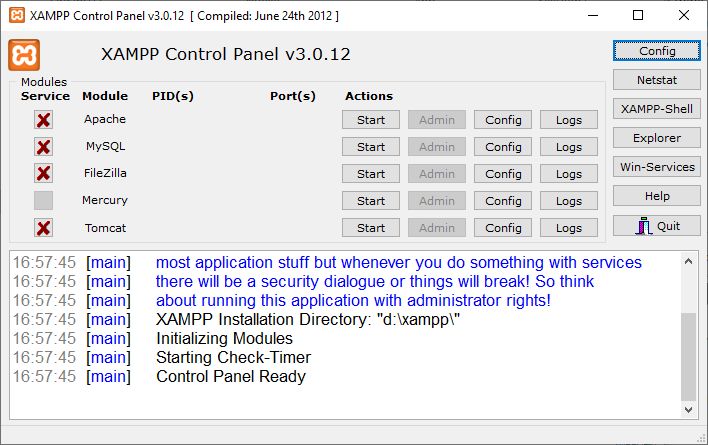
Please note that the [Start] button at the right of Tomcat is clickable. If you see Tomcat disabled, then it means that you moved files and folders in the wrong place in step #3 (you have to move to the root folder of the disk, not elsewhere!).
6. Please leave the checkboxes alone and DO NOT check them. Just click [Start] aside Tomcat.
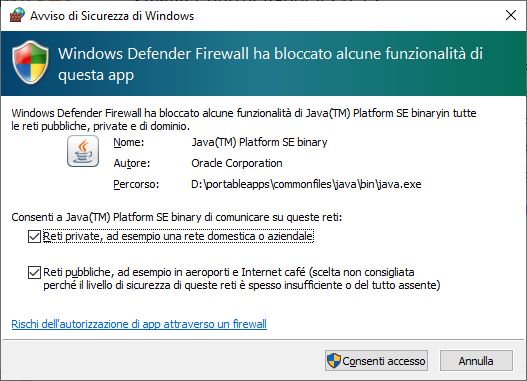 7. Tomcat will now start and will be marked in green color. Upon first use you will get a warning from Windows firewall asking permission for Java to communicate with external sites. You are advised to give both permissons.
The control panel should be now like this:
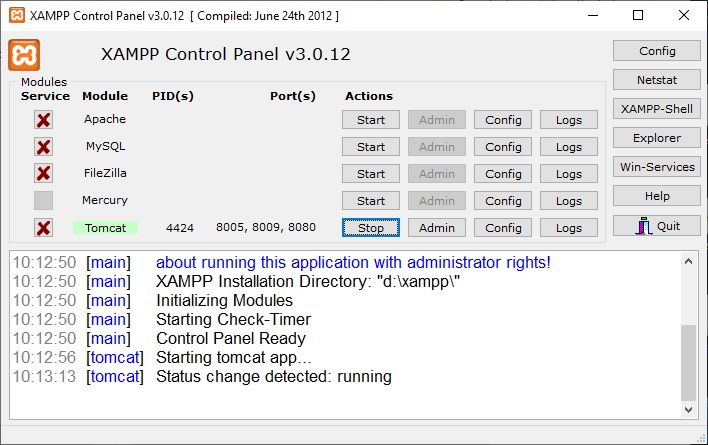
if Tomcat did not start, click the [Logs] button and open the most recent log files to diagnose the problem.
8. With your browser, open http://localhost:8080/dimx/ (copy this address in the URL bar and hit enter)
if everything is running correctly, you should see this (click to zoom):
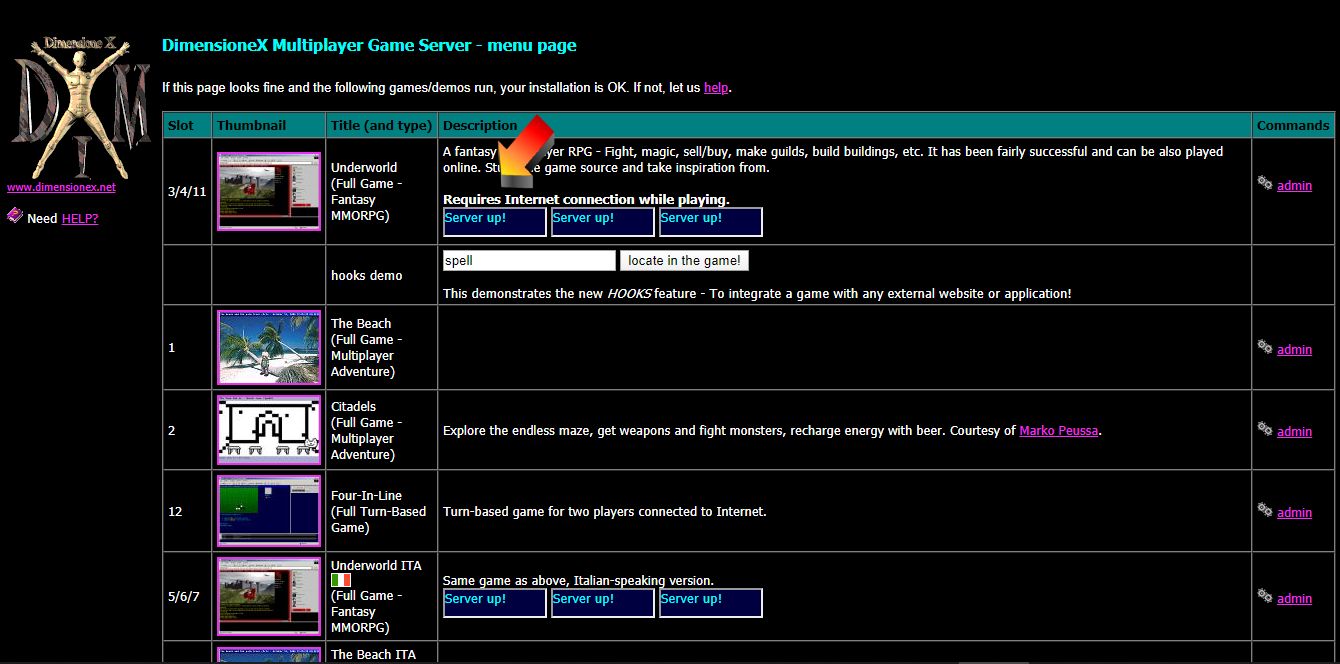
Please note the three small frames displaying “Server Up”. You can click any of the games and try it out.
9. Inside the PortableApps Menu, click Documents. Open “00 start from here.txt“. You will find a copy of these instructions and a few links to get you started.
When modifying sample games or developing new ones, it is advised that you use the program Notepad++ included in the package.
Method #2: generic installation (deploy .WAR file)
This method is fine if you are not using Windows. I wil summarize the steps but you must adapt to your case:
1. (Optional) Install JDK (recommended: 1.8 SE – get the JDK from Oracle website, requires free registration). Important! DO NOT install newer versions of Java, with versions newer than 1.8.* you will not be able to get it to work correctly.
2. Install Tomcat (recommended: Tomcat 7 – Linux users will be able to install via apt-get install tomcat7)
3. Start Tomcat and test that it is working by accessing it via the browser (typically: http://localhost:8080/ )
4. Stop tomcat
5. Go to our Download page and pick the second option “Deployable WAR file”. You will get a ZIP. Unzip it – verify that there is a dimx.war file inside.
6. Move dimx.war into Tomcat’s webapps folder.
7. Start Tomcat and verify a new folder named “dimx” is created automatically besides the .war file. DO NOT delete the war file, otherwise the folder will disappear.
8. Verify DimensioneX is working by opening http://localhost:8080/dimx/
9. If it works, you can now change Tomcat configuration as needed (eg. change port, add SSL, etc.). If it does not work, it’s likely that the file web.xml inside WEB-INF is not correct for your Tomcat version. We have provided other versions, but it’s helpful to check Tomcat logs upon startup and dignose the problem.
If you need support, please refer to: Support section
Don’t get scared by the initial complexity: DimensioneX is robust and it’s not that difficult to get it to run!
You might also leave a comment on this post, as it will help us to fix any inaccuracies.